Among the updates to O-Calc Pro, Version 5.03 includes a number of new shortcuts that can be used to expedite the pole building process. Existing shortcuts includes:
- Entering “Tip” for the Installation Height, to place an item at the tip of the pole
- Adjusting ‘height of attachment’ relative to the tip of the pole by entering “Tip – <value>” or “T-<value>”
- Adjusting ‘rotation’ of an object independently from other objects, by entering “ind=<rotation>” for the item being rotated, leaving all child items in the previous position
Below is a list of the new shortcuts that can be utilized in the 5.03 O-Calc Pro release, as well as an explanation of how each one works.
-
Entering ‘sag’ values as a measured height above the ground, using “hagl=<value>”
Within O-Calc, one of the options for tension is Sag to Tension mode. This mode enables a user to enter a sag value for the span, based on the equation (Attachment height on pole)-(Mid-span height above the ground). For example, if a span is attached at 20 ft above the ground on pole, and the measured mid-span sag point is measured to be 18 ft above the ground, the sag would be 2 ft. In O-Calc, a user would have to enter this value of 2 ft in the Data Entry window under ‘Span Sag (ft)’.
Now, this shortcut allows a user to enter instead hagl=18, and O-Calc will calculate the sag, and populate this attribute field correctly.
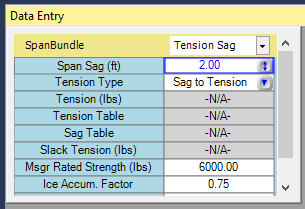
The image below shows the default sag for a span.

If I had measured the mid-span height above ground to be 16, I can simply enter hagl=16…
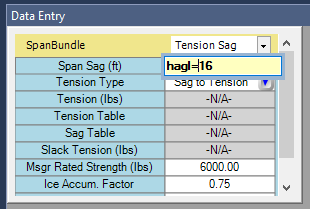
Then when I press enter, the shortcut computes the sag value for me.
-
Entering the ‘height of attachment’ value based on the top of an object
In previous versions of O-Calc Pro, certain pieces of equipment were modeled on a pole with a single attachment point, while in reality those objects can have more than one attachment point. When placing them in O-Calc, the user had to model them as if attached at the midpoint of the object.
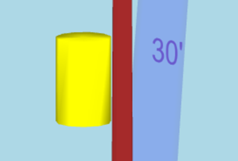
Now, a user can set the height of an object based on the top of it. This shortcut takes into account the dimensions of the object when placing it. This shortcut must be entered as T@<Value>
For Instance, if I have a transformer that is on a pole, with a unit height of 34 inches, typically by setting the Install Height to 30 ft, the midpoint of that transformer is at 30 ft.
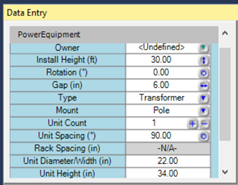
Now, if I enter a value of T@30 for my installation height, the top of my transformer will move to 30 ft.
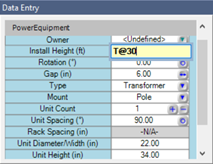
This can be verified by looking at the new value for Install Height, which is 28.58.
-
Entering the ‘height of attachment value based on the bottom of an object.
In addition to being able to adjust an object based on it’s top, a user is now also able to adjust the object based on the bottom of it. Using the same example, if a user were to enter the shortcut B@<Value> for the Install Height attribute, the user would be able to set the attachment height based on the bottom of that object, taking its Unit Height into account.
For the same transformer, if B@30 were entered for installation height, the bottom of that transformer would be set to 30 ft above the ground.
Recent Comments